|
Omnis News Tech Tips 2000 Below are past Omnis News Tech Tips from 2000. Note: Clicking on the Omnis logo will open that dates news page in a new browser window.
Did you know In general, the properties of a web component are unique to the object and their names will not clash with standard Omnis field properties. However, when a web component property has the same name as a standard built-in Omnis field, you must access the external property using a double colon (::) before its name. For example, the tab bar component has the property $currenttab which you must refer to using the notation: Do $cinst.$objs.tabbar.$::currenttab.$Assign(2) Did you know the tab bar has a series of thumb tabs on which the
user can click. The tab bar is typically used with the paged pane
component to present a form with a number of layers or pages, e.g.
a banking example could have different panes for different parts
for the user's account. The tab bar reports the evClick event and passes the pLineNumber parameter containing the number of the tab clicked on. The following method is the $event() method for a tab bar on a window containing a paged pane. The method detects the evClick on the tab bar and sets the currentpage of the paged pane. On evClick Do $cinst.$objs.pagepane.$currentpage.$Assign(pLineNumber)
Did you know you can create some very nice buttons in your remote forms using the new Transbutton component which provides a standard button that displays a different image when the user's mouse is over the button. The transbutton component reports the evClick event which you can detect in the $event() method for the object; in this respect a transbutton behaves like a standard pushbutton. You specify the icons for the OUTside and INside images in the $outsideicon and $insideicon properties. Remember you must add the name of the icon page containing the icons for your transbuttons in the $iconpages property of the remote form.
The $boldover property specifies that the text is boldened when
the user's mouse is over the transbutton, and the $effect button
provides numerous styles for the border of the button.
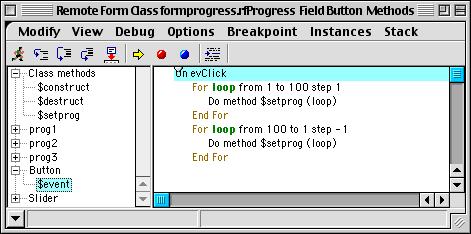
Did you know in Omnis Studio V3 you can display a progress bar in your remote forms using the new Progress bar web component. The value of the progress bar is specified in the $val property which is typically linked to the value of a counter in a looping command; and using the new client method execution, the counter can execute on the client and pass a value directly to the progress bar. You can specify the range for the progress bar in the $min and $max properties. You can specify the $backcolor of the bar as well as the $progresscolor. The current value of the progress bar can be either a series of blocks (when $blocks is kTrue) or a continuous strip. Furthermore your progress bar can be either vertical or horizontal by setting the $vertical property.
The progress bar component has no events or built-in methods of
its own. Rather you can control it by assigning to the $val property
at runtime on the client machine.
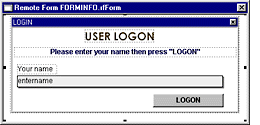
Did you know you can implement a 'cookie' like mechanism for your Omnis web applications using the UserInfo web component. This is very useful where you want people to register the first time they enter your site, but allow immediate access for subsequent visits. The UserInfo component stores user information on the client machine (in the Webclient/Formcache folder under Windows and Linux, or the System folder on MacOS) and lets you retrieve this information when they revisit your site. The UserInfo, which has to be placed on your remote form, reports the evUserDataInit event when the remote form is opened on the client. The evUserDataInit event passes the pUserData parameter containing the client's user information. To store the information, such as username and/or password, you need to assign the user info to the $userdata property of the UserInfo component. Please refer to the new Studio V3 Web Development manual for full details about how to use the UserInfo component. Also, take a look at the Banking example in the web gallery that uses the UserInfo components in its logon screen.
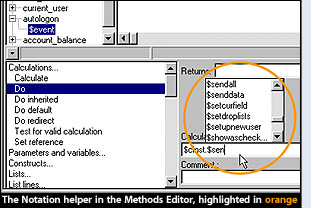
Did you know in Studio V3, when you are typing a notation string
into the calculation field of the method editor you can pause to
allow the Notation Helper to popup a list of possible properties
and methods that can be used in the current notation string; the
list is context-sensitive, and as you type the first few characters
of a property or method name Omnis modifies the contents of
Did you know you can specify that a remote form method is to run on the client rather than the server. In particular, you can perform simple calculations or process events on the client, thus avoiding the overhead of sending events and messages between the client and server, and reducing the network traffic and workload on the server. Methods that run on the client can contain only a subset of the complete Omnis command language, but allow you to do a lot of nice things.
To set a method to client execution, Right-click/Cmnd-click on the remote form's method name and select the Execute On Web Client popup menu option. In design mode, Omnis checks to see if it contains any commands that cannot be run on the client, and also checks the notation and functions used in the method. If the method can be run on the client it is shown in pink (the default) and the command list (bottom left of method editor) is modified to include only those commands that can be executed on the client. In the context of a client method, the functions and hash variables tabs of the catalog window only display functions and hash variables available to client methods. This feature and many others are fully documented in the new V3 docs.
Did you know in addition to the built-in components within Omnis Studio, you can extend the range of field types available for windows and web forms by adding external components to the Component Store and using them in your applications. You add external components to a window or remote form class from the Component Store in exactly the same way as the built-in fields and objects. Omnis supports a number of different types of window component:
External component libraries are placed in the XCOMP folder, or
the Webcomps folder for web components,
Did you know you can print a report to HTML without prompting for
destination? To do this use the following Omnis method: You could also use the $setparam() method to change the other settings
which are available in the HTML device setup window. All constants
are available via the Catalog.
Did you know you can create you own Welcome library, using the same welcome.lbs, to do literally anything when the user starts Omnis. For example, if your application contains a suite of libraries
you can use a Welcome library to present them to the user, or like
the Omnis one you can create a number of slides to introduce your
product. Examine the Startup_Task and Welcome window classes of
the existing welcome library, and in particular look at their Class
methods. The code in the Welcome library uses the $welcome() method
which is contained in $root.$modes and has the options kWelcomeNewLibrary,
kWelcomeLastLibrary, and kWelcomeToggleStop. You can set the mode
of the Welcome library using: Do $root.$Modes$welcome(kWelcome...)
Did you know you can create all types of dialog using the Prompt for input command, which opens a message box requesting a value from the user. You can specify the text for the prompt, title and icon for the message box, and the maximum number of characters for the input. If the user enters a value and presses OK, the command sets the flag and returns the user value in a return field. The Sound bell option causes the system beep to sound when the message box opens; the Cancel button option adds a Cancel button to the message box, the flag returns false if the user presses the Cancel button; the Upper case only option forces all input to be upper case, while the Password entry option hides the input for each character entered. For example: Prompt for input Please enter your name Returns
Did you know sometimes it is necessary to step through all the dates between a start date and an end date. For example, you might want to step through all the months between two dates, all the years between two dates, or all the days between two dates. The following example will allow you to do this. Example: ; declare the following vars Calculate TempFDT as #FDT For CurDay from StartDate to EndDate step 1 Calculate #FDT as TempFDT This will step through all the DAYS between the StartDate and the EndDate. If you want to step through all the months, you need to edit the code above with: Calculate #FDT as 'yM' Notice that by changing the formatting of #FDT, you can specify which date or time constant is to be used when incrementing the 'For' loop. All you have to remember is, to order the date/time #FDT in reverse order. This example is from Rudolf Bargholz of our German office.
Did you know you can get the ASCII value of a character in a string using the asc(string,number) function; the position of the character is specified by number. The value returned is between 0 and 255, or -1 if number is less than 1 or greater than the length of string. For example: asc('Quantity',1) Did you know sub windows are a powerful feature of Omnis Studio.
Many developers use these controls by assigning the $classname property
dynamically. This assignment invokes the $destruct method of the
current sub window instance. Once invoked the window instance will
close and this cannot be aborted. To avoid destroying an instance
prematurely, check with the instance prior to reassigning the class
name. For example,
Did you know you can handle all the return values of a $fetch()
method using Switch/Case statement. The following example illustrates
a loop that continues until all rows selected on the server have
been addressed.
Did you know all report sections except for Page footer and End of report let you specify the $startmode, which tells Omnis where to start the section. You can choose one of the following options:
When you choose one of the above start modes, the $startspacing property is enabled in the Property Manager, which lets you enter a measurement for the $startmode. The $startmode and $spacing is shown on the report section marker.
Did you know depending on the size of the list to be built and the number of tables involved, building a list involving an outer join can be a bit slow using OmnisSQL. But you can split the query and list building into two parts based on the presence (and then the absence) of the necessary foreign key. In the first case, knowing there is a foreign key, the query can be maximised for it. The speed improvement can be impressive. Richard Ure
Did you know you can find out the position of a substring within a larger string using the pos(substring,string) function. The substring must be contained within string in its entirety for the returned value to be non-zero. Also, the comparison is case sensitive and only the first occurrence of a substring is returned. POs('Mouse','Mickey Mouse') The POs() function is useful for finding the position of delimiters, and used with mod() you can return part of a string e.g. you can strip the extension from a file name as follows: If POs('.',FileName) ;; if Filename contains a dot Did you know you can populate a list with a number of default lines of data, rather than building the list from your database every time the list is initiated. Most types of simple list fields (inc list box, combo, & dropdown) allow you to set up some default data in the defaultlines property; using the defaultlines of a list is convenient for short lists of data that doesn't change, such as a Salutation/Title field containing Mr, Mrs, Ms, etc. You can load the data for the selected line in a default list in the usual way via pRow parameter returned to the $event() method for the list field.
Did you know that you can select or deselect all lines in a list
in a single line of code using the $sendall() method to assign the
$selected property of lines in your list. It's also possible to use notation to remove all selected or non-selected
lines from your list in a single line of code using the $remove()
method and the constants kListDeleteSelected and kListKeepSelected.
To calculate the number of selected lines or non-selected lines in your list you can use the totc() function. Caculate iLineCount as totc(iMyList,#LSEL) ;; total selected lines Calculate iLineCount as totc(iMyList,not(#LSEL)) ;; total non-selected lines.
Did you know you cannot name a background object, so how do you
reference it in the notation? The answer is to refer to the object
by $ident. So for example, to change the color of a rectangle with
ident 1018 you can use the code: Remember you need to use the notation group $bobjs to reference background objects, rather than $objs containing all the data field objects.
Did you know you can use the Omnis VCS to manage all types of non-Omnis components such as external components, text files or Web pages, PDF files, even Omnis data files and complete libraries. In fact you can use the Omnis VCS to manage any type of project, including ones that don't contain Omnis libraries or classes. To check in non-Omnis components you use the File Browser available within the VCS itself: to open the File browser, open the Omnis VCS and select the VCS>>File Browser option from the VCS menu bar. See Chapter 14 in the Using Omnis Studio manual for more details.
Did you know there's several notation 'group' methods that act on the whole group or tell you things about the group; groups include such as $iwindows, $itasks, $itvars, etc. The $add() method inserts a new object in the group, so you can create libraries, classes, instances, list columns, list lines, etc.; $remove() removes the object from the group (does not delete the object); $sendall() sends a message to all members in the group; $count() returns the number of items in the group; $makelist() lists the members in a group; $first() and $next() return a reference the first and next items in the group; $addbefore() and $addafter() inserts an object into the group either before or after the specified object (doesn't work for $cols group). Chapter 4 in the Omnis Reference has other methods and examples. Did you know the Omnis debugger lets you set several types of breakpoint, including persistent, one-time, and field breakpoints. A breakpoint is a marker on a method line; when the debugger reaches that line, it stops execution and opens the method editor at that line. Breakpoints are useful when debugging Omnis applications, particularly when you are testing web applications locally, although you must remember to remove them when moving your app to a remote server. You can set breakpoints using the Breakpoint menu, using various key combinations shown on the Breakpoint menu, or by right-clicking in the left margin of the method pane in the method editor.
Did you know the Data File Browser is a handy tool for creating, opening and managing your data files. The data file browser lets you check your data file and reorganize if necessary. Reorganization ensures the structure in your data file matches the file classes in your library, and is only necessary when you add or delete indexes, change the data type of a field, or you change the connections. Reorganization is not needed if you simply add a field, or change a field name or data length. You should always ensure that you have a secure backup of your data file before reorganizing it. See Chapter 10 in the Omnis Programming manual for further details.
Did you know you can execute multi-line SQL statements in the Interactive SQL tool. When using the Interactive SQL tool from the SQLBrowser in OMNIS Studio, you can enter muliple lines of SQL in the entry box by pressing Return after each line. You can then execute the SQL text either by clicking on the running man icon or by pressing Enter on the numeric keypad.
Did you know there are more than 11 system tables in every Omnis library controlling things such as the window and report fonts, the date formats, the input masks for entry fields, character styles for window fields, and the icons available in the library. At this point some of you might be saying "I've never seen these, where and how do you view/edit them"; well the system tables are normally hidden in the library browser, but you can show them by pressing Shift-Ctrl/Cmnd-A. To edit a system table you must double-click on its icon in the library browser; depending on the table a different editor will open, for example, when you edit the #ICONS table the Icon editor will open.
Did you know you can create a splash screen for your application using a window, button area and a few simple methods. It involves opening a wAbout window from the $construct() method in the startup task of your library. The wAbout window contains a button area field to detect clicks and the following methods. ; $Construct() of Startup task ; $construct() method for wAbout ; $event() method for button area field ; Close Window method ; Timer Control method
Did you know a 'modify report field' is a type of window field that lets you display a report class on an open window. This allows your users to change certain aspects of a report class at runtime, including the height of the Record section, the contents of headers and footers, the position and color of graphics on the report, and so on. For more details see Chapter 7 in the Omnis Programming manual.
Did you know you can use the pick() function to select an item
from a list of values depending on the result of the initial integer
parameter: if it's zero the first value is selected, if it's 1 the
second is returned, and so on. pick(lv_num, 123, 'abc', 4455) ; returns ABC if lv_num is value 1 This week's tip is from the Omnis Reference manual.
|